
A garden can have healthy plants and bright flowers but still look unfinished. The problem is often the border. Grass spreads into the soil, plants lean over paths, and weak edges make planting beds lose their shape.
The right border brings order to the yard. It separates the lawn from planting areas, makes mowing easier, and connects the garden to your home. It can also turn a plain bed into a strong design feature.
These garden border design ideas include curved beds, formal layouts, living edges, and practical edging materials. You will find options for sunny areas, shady corners, slopes, small yards, and drainage trouble spots. Some ideas are easy weekend projects. Others take more planning but can last for years.
Before choosing one, think about four things: appearance, cost, durability, and upkeep. A border should look good, but it also needs to work for your space and schedule.
How to Choose a Garden Border That Fits Your Yard
Start by looking at your home and the main features already in your yard. Brick borders often work well beside traditional homes. Weathered timber suits cottage and rustic gardens. Slim steel edging can give a modern yard a clean finish.
Next, check the growing conditions. Note how much sun the area receives and whether the soil stays wet or dry. These details matter if plants will form part of the border.
Think about maintenance too. A living edge may need trimming, dividing, or watering. Stone and brick last longer, but weeds can grow between loose pieces. Wood feels warm and natural, yet it will eventually rot.
The border’s shape also affects the mood of your yard. Straight lines look formal and controlled. Broad curves feel softer and more relaxed. Avoid small, uneven waves because they can look accidental and make mowing harder.
Finally, give the bed enough depth. A thin strip may hold one row of flowers, but it rarely creates a full design. A deeper bed gives you room to layer ground covers, flowers, grasses, and shrubs.
1. Create a Sweeping Curved Flower Border
Best for: Square lawns, corner beds, and relaxed garden styles
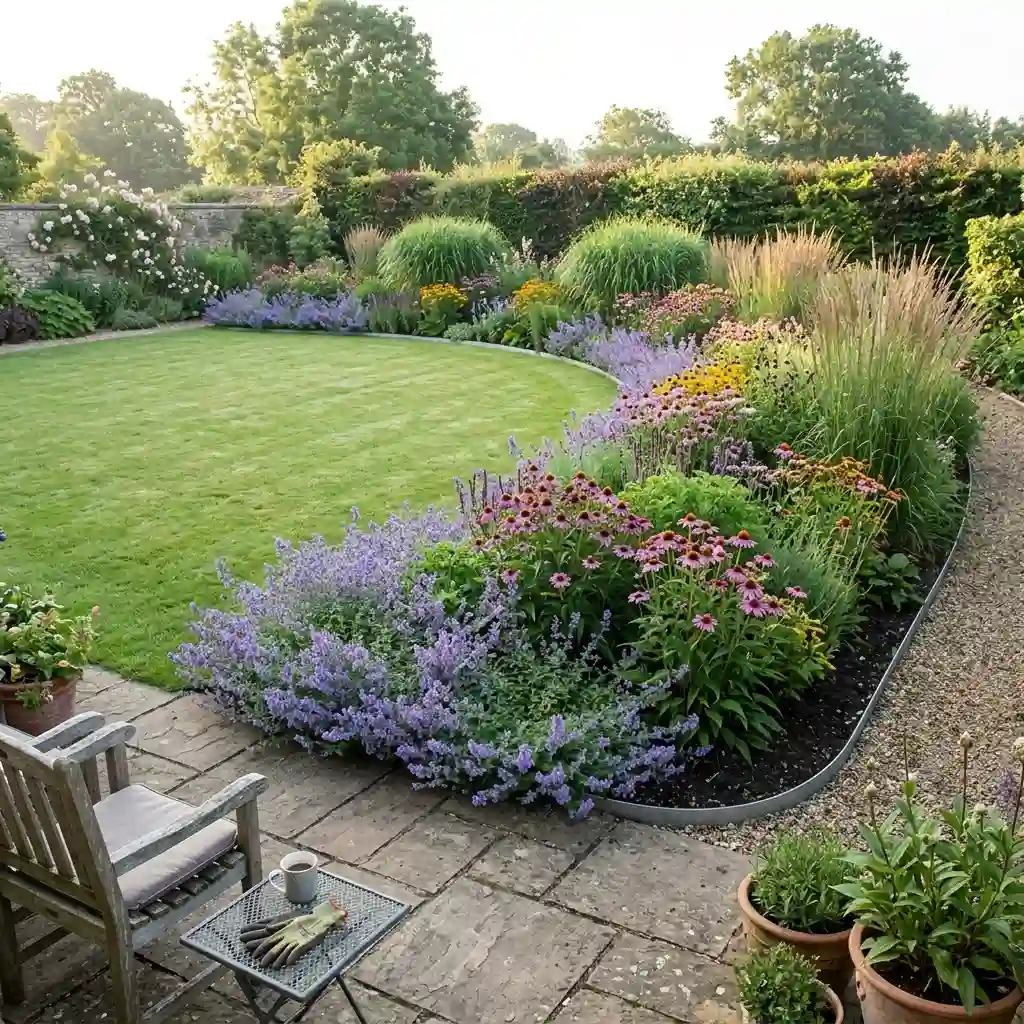
A broad curve can soften the hard lines around a lawn, patio, or fence. It also gives you more planting space without making the yard feel crowded.
Lay a garden hose or rope on the ground before cutting the bed. Move it until the curve looks smooth from the house, patio, and main walkway. Wide curves usually look better than several tight bends.
Make the bed deep enough for more than one plant layer. You could place low-growing catmint along the front, coneflowers through the middle, and ornamental grasses at the back. Repeat each plant several times along the curve so the design feels connected.
Keep the edge clean with a spade, brick, stone, or flexible metal edging. This stops grass from weakening the shape.
2. Use a Straight Border for a Neat, Formal Look
Best for: Front walks, driveways, modern homes, and formal gardens
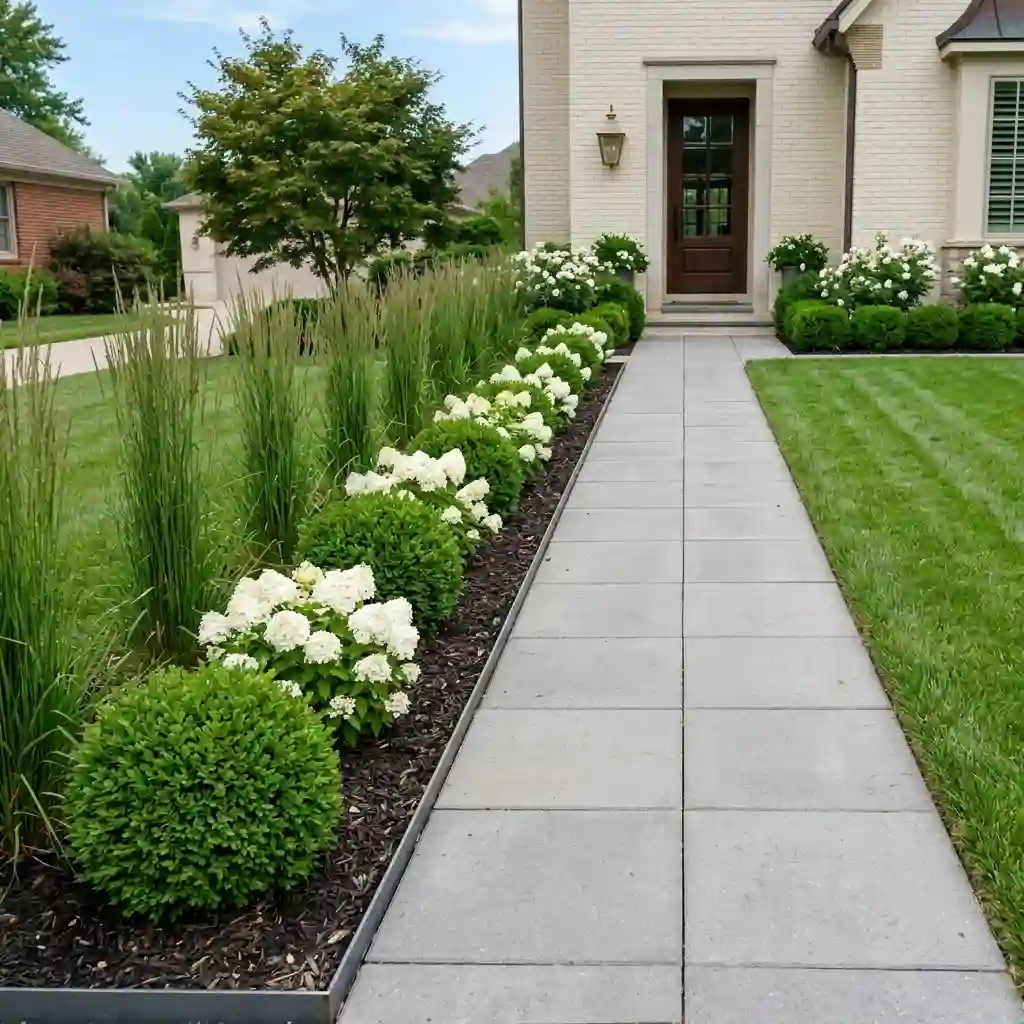
A straight border creates a clear sense of order. It works well beside a walkway, fence, driveway, or rectangular lawn.
Use stakes and string to mark the line before removing grass. Check the border from both ends to make sure it looks straight. Even a small bend can stand out once the edging is installed.
Repeat plants at regular points instead of filling the bed with many unrelated types. A simple mix of compact shrubs, white flowers, and upright grasses can frame an entrance without making it feel busy.
Keep the color palette limited and maintain a sharp edge. This style depends on clean lines, so plants hanging far over the lawn can weaken the effect. Choose compact varieties and check their mature width before planting.
3. Layer Plants from Short to Tall
Best for: Deep beds beside walls, fences, and property lines
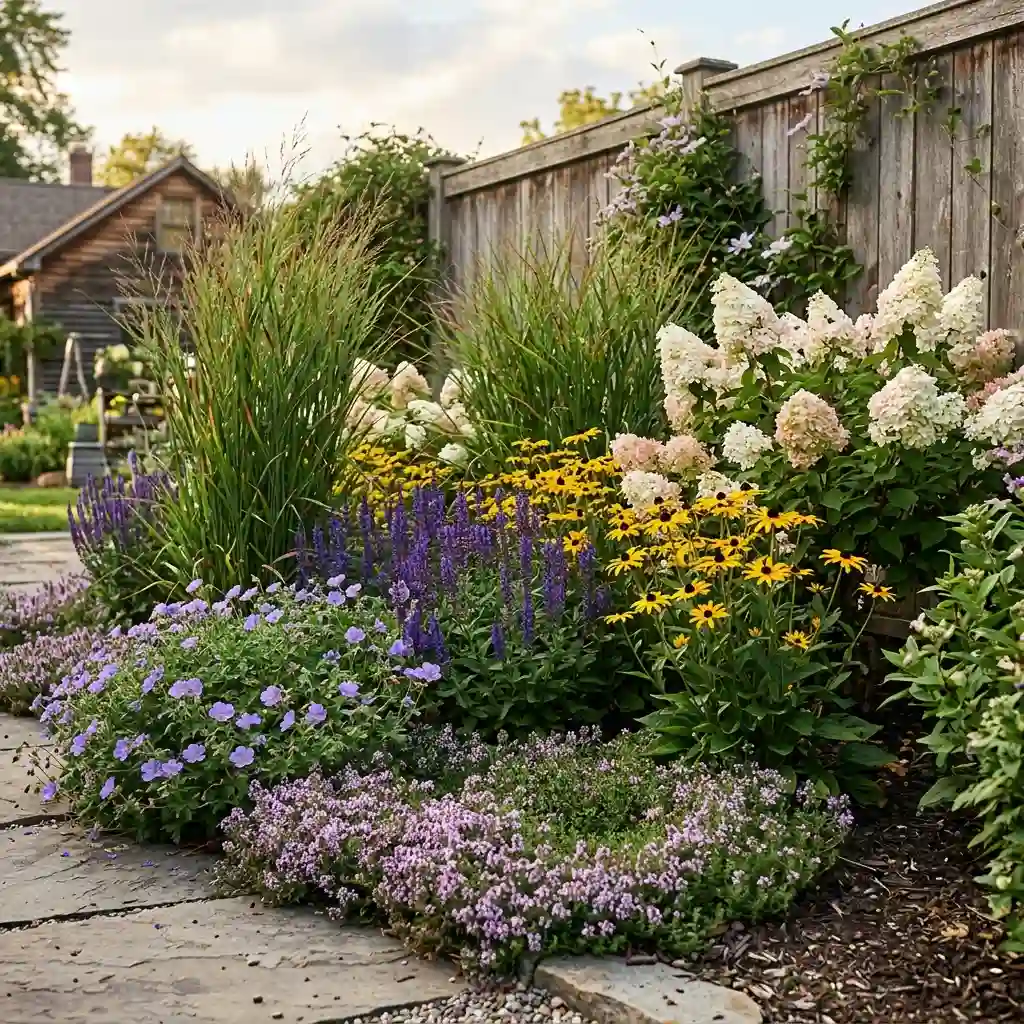
Planting in layers lets you see more of the border at once. It also creates depth and prevents taller plants from hiding smaller ones.
Place low plants such as creeping thyme or compact geraniums near the front. Use medium-height flowers such as salvia and black-eyed Susans in the middle. Add ornamental grasses, compact hydrangeas, or other taller plants at the back.
Do not plant everything in stiff rows. Let groups overlap slightly so the border feels natural. Repeat key plants in several places to lead your eye through the bed.
Always plan with mature plant sizes. A small nursery plant may spread several feet after two or three growing seasons. Correct spacing may look bare at first, but it reduces crowding later.
4. Build a Border Around Two or Three Colors
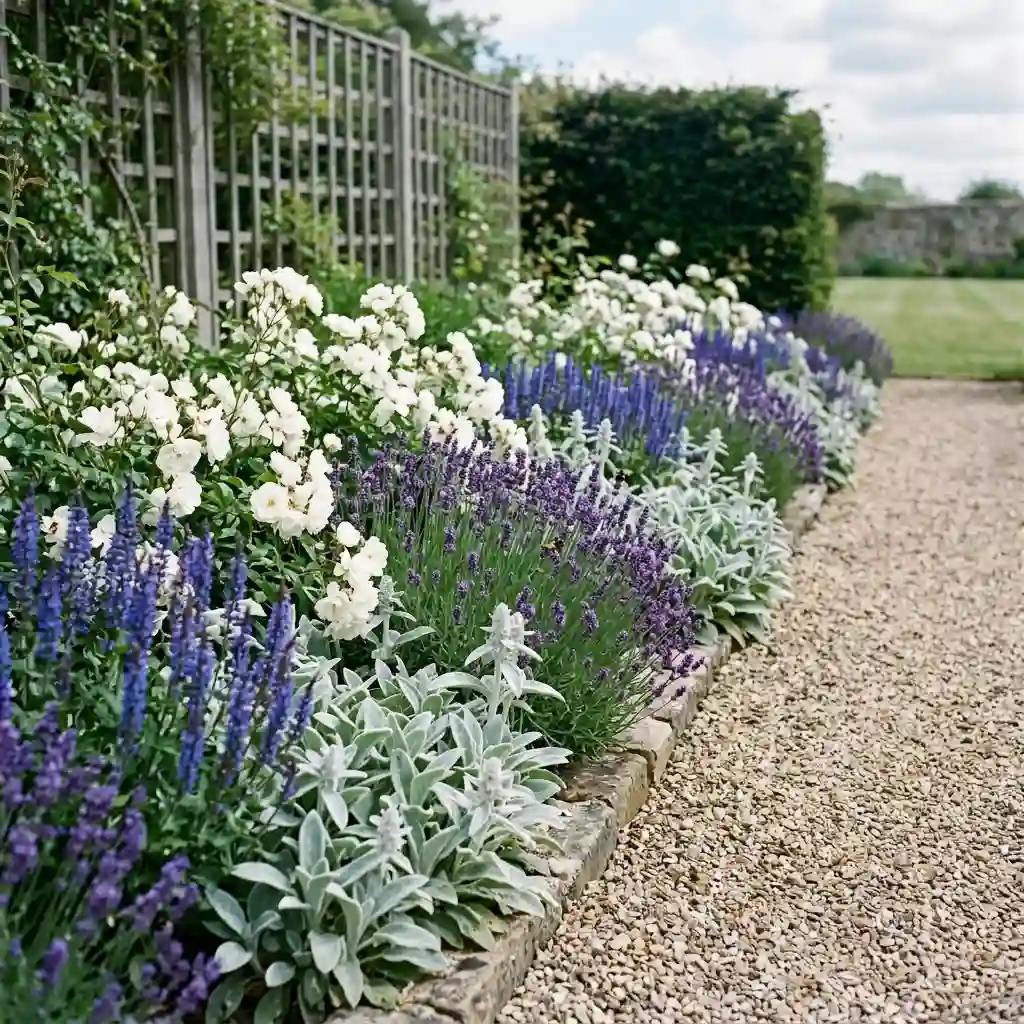
Best for: Front gardens and yards that feel visually busy
A controlled color palette can make a mixed flower border feel calm and planned. Start with two main flower colors, then add one accent color if the design needs more energy.
For a cool scheme, try blue salvia, purple lavender, white roses, and silver lamb’s ear. For a warmer look, combine yellow coreopsis, red-orange flowers, and deep green foliage.
Repeat each color along the full border. Do not place all the blue flowers at one end and all the white flowers at the other. Repetition ties separate planting groups together.
Look at nearby walls, doors, paving, and outdoor furniture before choosing colors. The border should connect with the setting. Use foliage to carry the scheme when flowers are between bloom periods.
5. Plant a Border That Looks Good in Every Season
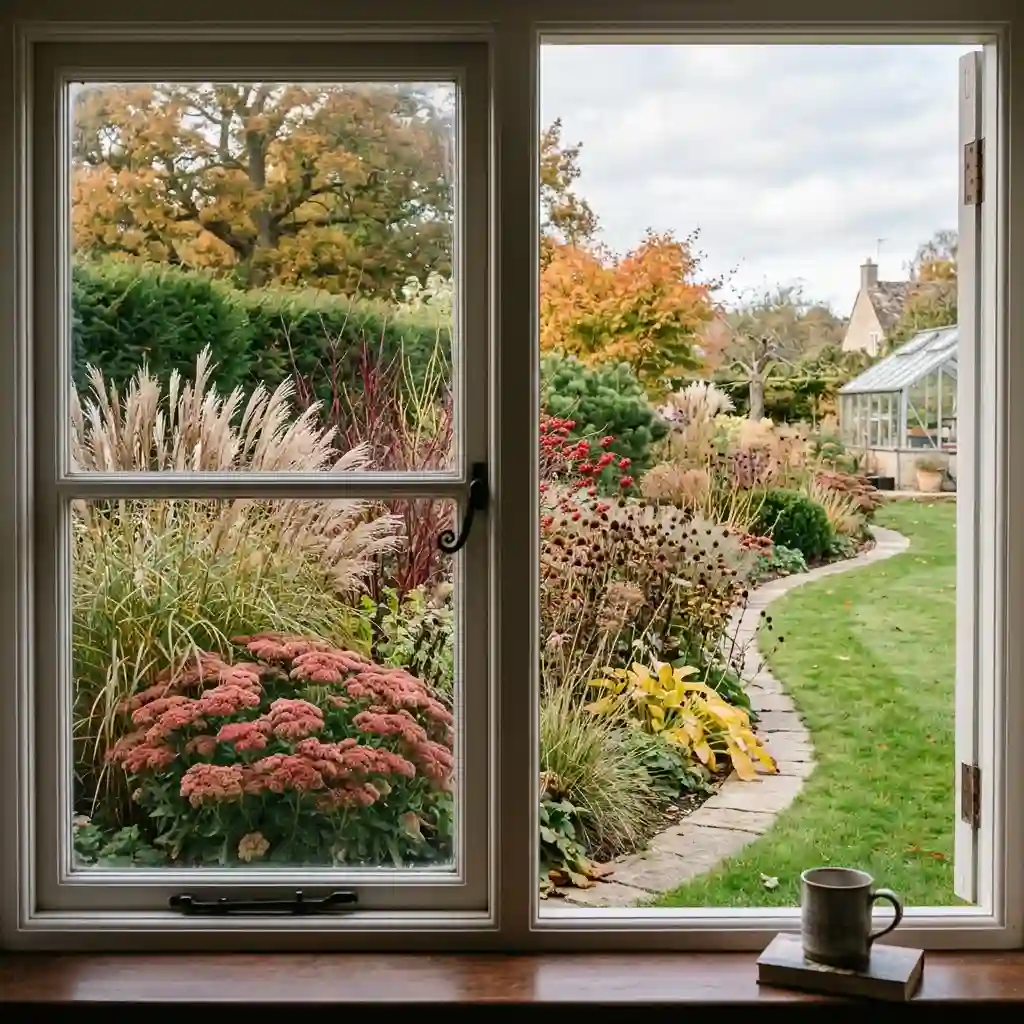
Best for: Front yards and beds visible from indoor windows
A flower border can look wonderful in summer and empty for the rest of the year. Fix this by giving each season at least one strong feature.
Use bulbs such as daffodils for early spring color. Add long-flowering perennials for summer. Sedum, grasses, berries, and seed heads can provide fall interest. Evergreen shrubs, colored bark, and strong plant shapes support the border in winter.
Avoid cutting down every plant as soon as flowering ends. Some dried stems and seed heads remain attractive and may provide food or shelter for wildlife.
Write down what the bed offers in each season. If one period looks weak, add a plant that fills that gap. A dwarf evergreen, for example, can give the border structure when most flowers are dormant.
6. Edge the Border with Natural Stone
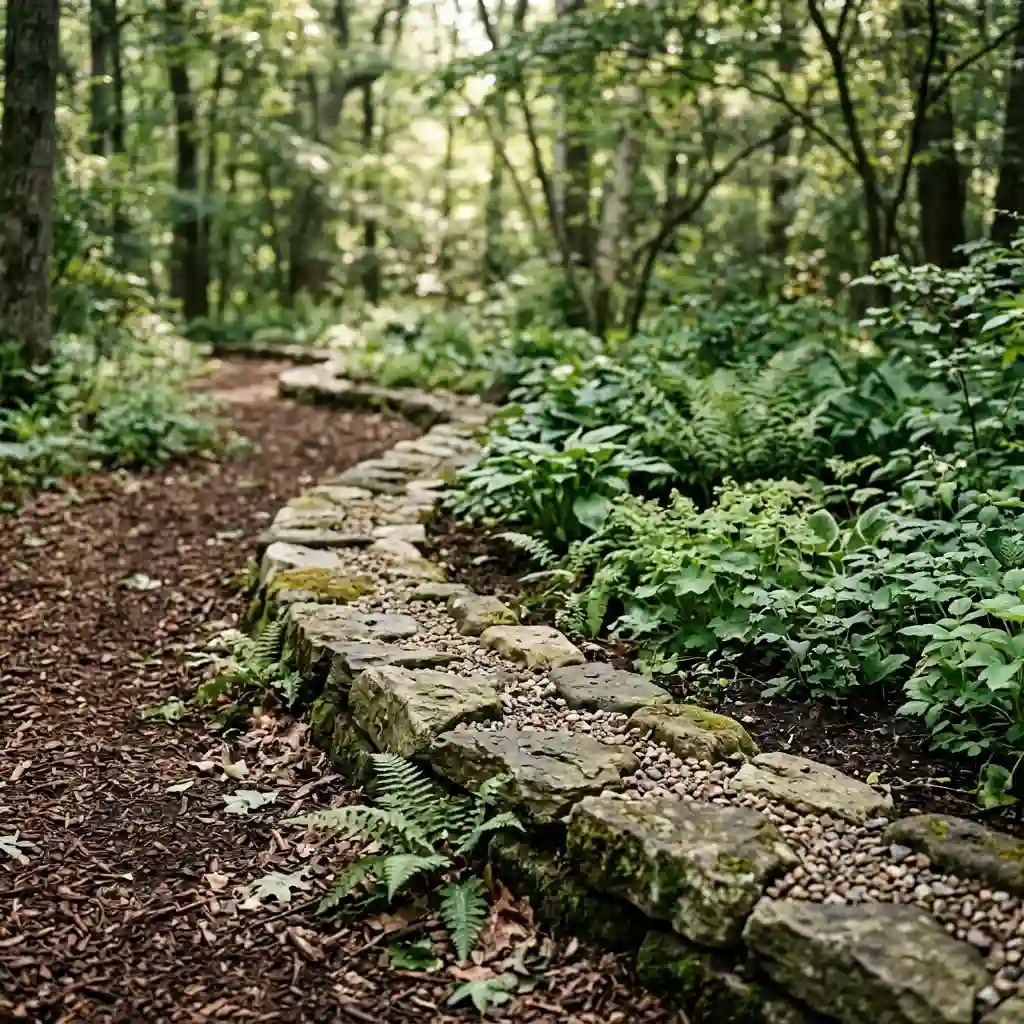
Best for: Cottage, woodland, rustic, and informal gardens
Natural stone creates a durable edge that settles into the landscape. Choose a stone that relates to your home, patio, or local area. This keeps the border from looking like a separate project.
Partly bury each stone instead of placing it directly on the soil. This makes the edge look established and reduces movement. Use stones with similar thicknesses if you want a level mowing strip.
Irregular fieldstone works well in relaxed gardens. Cut limestone or evenly shaped stone gives you a cleaner finish.
Wide gaps can collect soil and weed seeds. Fill them with small gravel or pack them tightly during installation. Stone can be heavy and slow to place, but it lasts longer than many low-cost edging products.
7. Install a Classic Brick Border
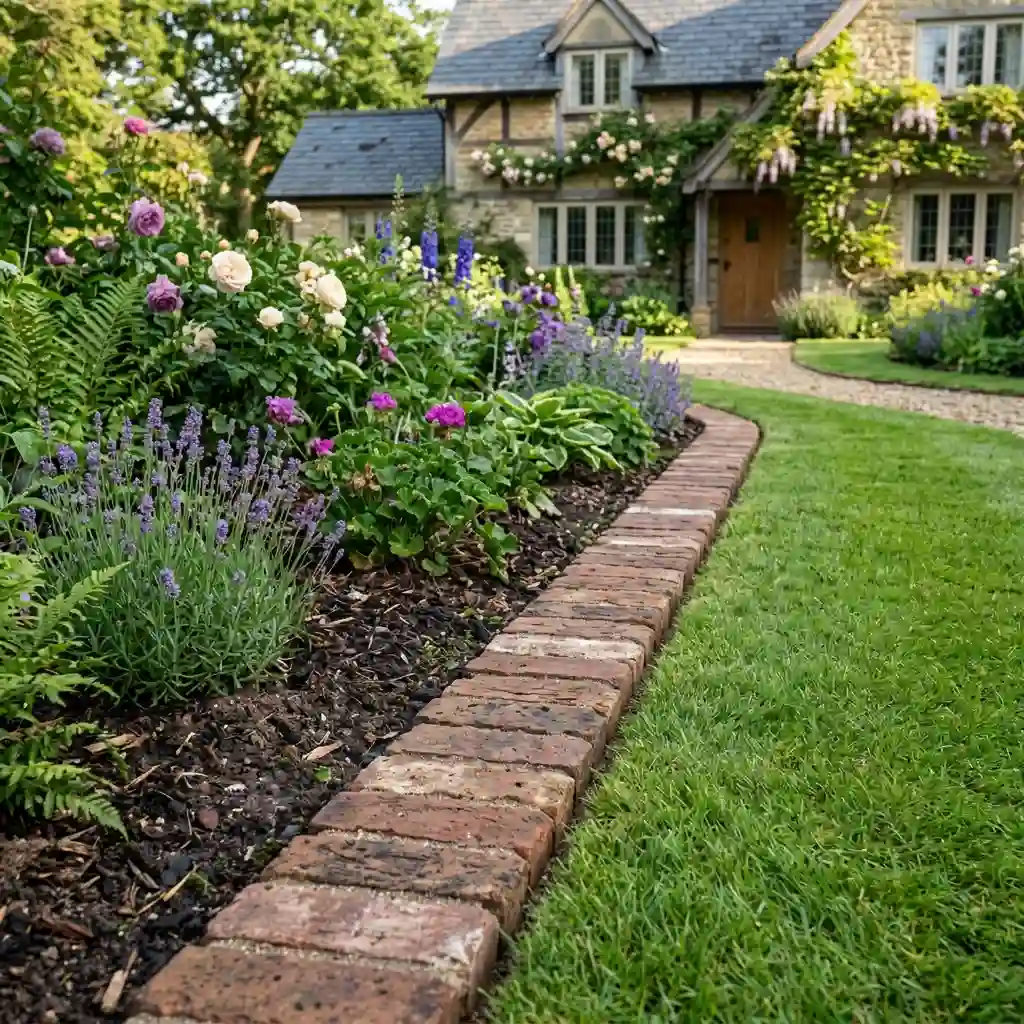
Best for: Traditional homes, cottage beds, and formal paths
Brick is one of the most flexible flower bed border ideas because you can arrange it in several ways. Lay bricks flat to create an edge that mower wheels can cross. Set them upright when you need stronger separation between soil and grass.
Reclaimed brick adds age and character. New brick provides a more even color and shape. You can also use soldier, basket-weave, or sawtooth patterns to change the final look.
Prepare the base before laying the bricks. Remove loose soil, add a compacted layer of suitable base material, and check the level as you work. Poor preparation can cause bricks to sink or tilt.
Brick is durable, but weeds may appear in open joints. Tight placement and routine sweeping can reduce this problem.
8. Add Slim Metal Edging for a Clean Finish
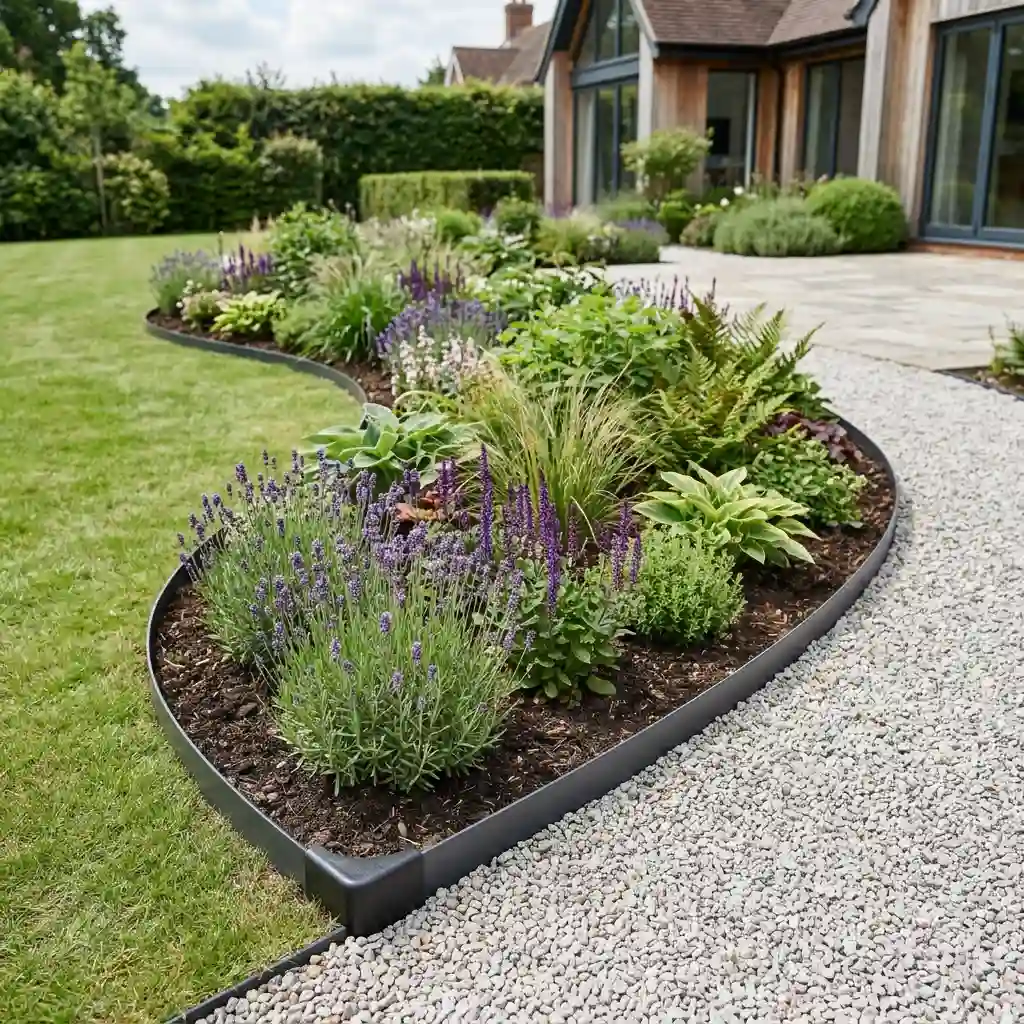
Best for: Modern yards, curved beds, and narrow spaces
Metal edging creates a clear line without taking much visual space. It works well when you want the plants or gravel to receive most of the attention.
Steel is strong and can develop a weathered finish. Aluminum is lighter and does not rust in the same way. Painted finishes offer a clean look, but scratches may become visible over time.
Flexible strips can follow smooth curves as well as straight lines. Keep the top close to ground level so it does not become a trip hazard or catch mower blades.
Dark metal edging looks especially good between pale gravel and green grass. Check all joints and exposed ends during installation. Sharp or loose edges can be dangerous, so use the correct connectors and protective caps.
9. Use Timber for a Warm, Rustic Edge
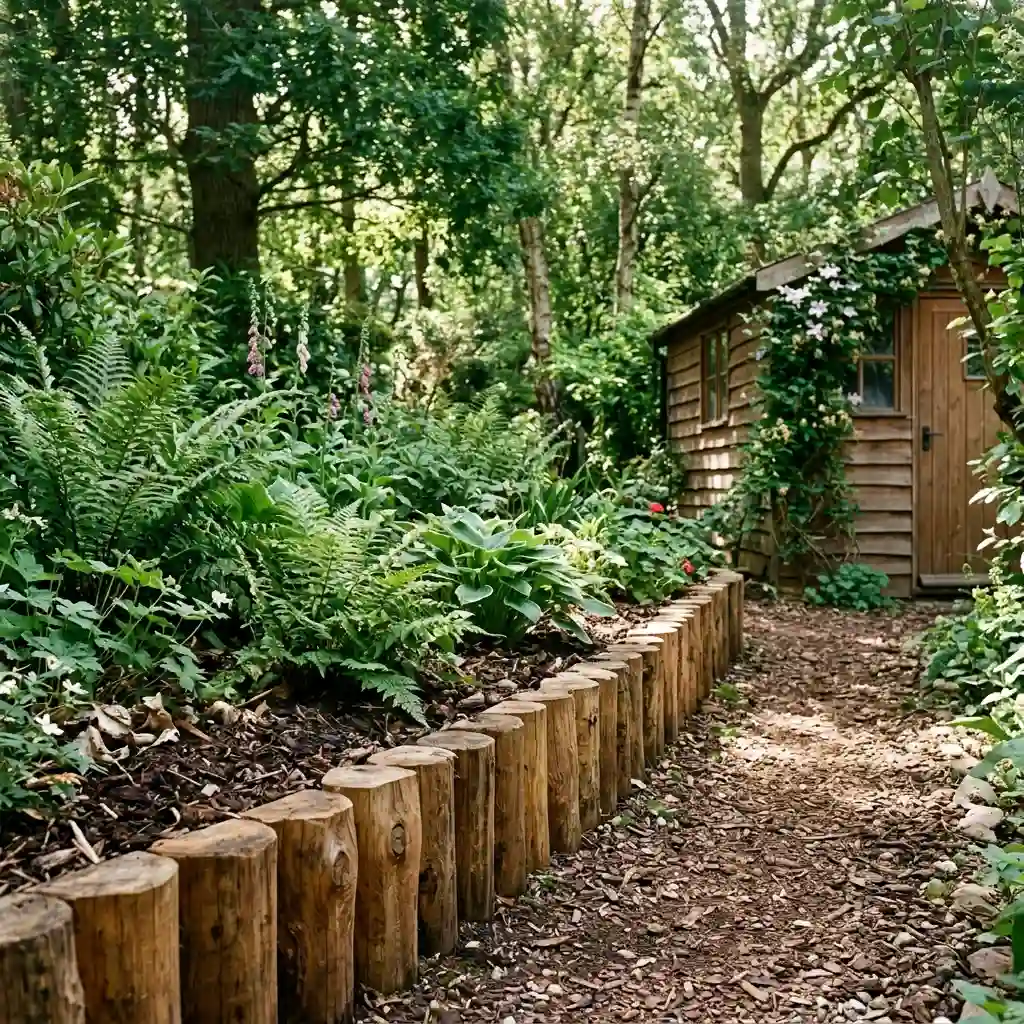
Best for: Raised beds, woodland gardens, and low-cost DIY projects
Wood adds warmth that stone and metal cannot always provide. Straight boards work well around square beds, while short logs can create a softer edge around informal planting.
Use naturally rot-resistant or exterior-rated wood. If the border surrounds herbs or vegetables, check that the treatment is suitable for food-growing areas.
Set heavy timber on a level base and secure it when needed. Uneven pieces can create gaps where soil escapes and weeds grow. You can leave the wood natural or stain it to match a fence, deck, or shed.
A wooden garden border will not last forever. Moist soil speeds up decay, especially where the wood touches the ground. Still, timber can be a practical choice when you want an affordable edge that is easy to cut and install.
10. Add a Gravel Strip Between the Lawn and Bed
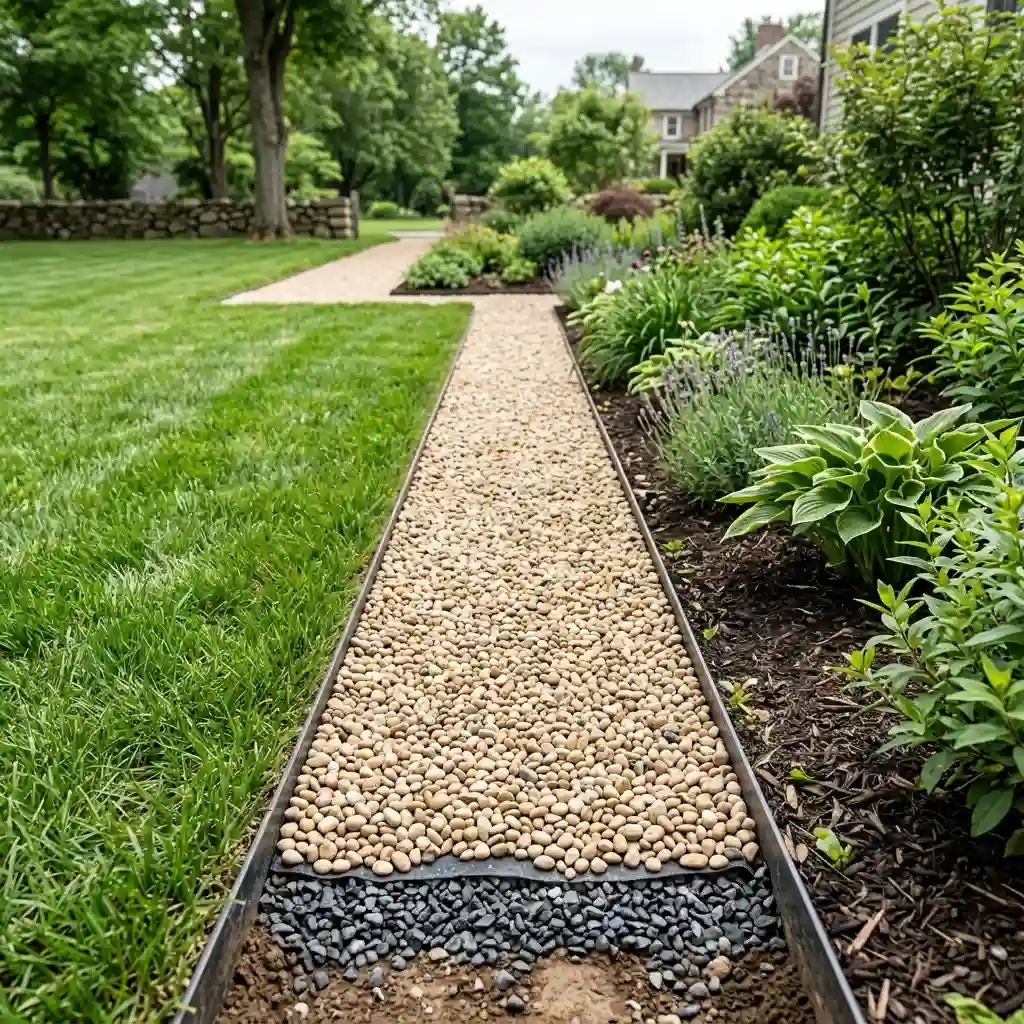
Best for: Low-maintenance yards and beds that are hard to mow
A narrow gravel strip creates space between grass and plants. It can make mowing easier and stop wet soil from spilling onto the lawn.
Create a strip about 6 to 12 inches wide, based on the scale of the yard. Install edging on both sides so the gravel does not spread into the lawn or planting bed. A suitable permeable barrier underneath may help reduce weeds while allowing water to pass through.
Choose gravel that matches nearby paths or paving. Pale gravel brightens a dark corner, while gray or brown stone tends to blend into the landscape.
Leaves and soil will collect in the gravel over time. A hand rake or leaf blower can help, but this option is not maintenance-free.
11. Frame the Bed with Low-Growing Plants

Best for: Soft cottage borders, paths, and beds without hard edging
Plants can form a living border that hides bare soil and softens the edge of a path. The key is choosing compact plants that suit the site.
Creeping thyme can work in sunny, dry areas. Dwarf mondo grass may suit mild climates and partly shaded spaces. Compact geraniums, heuchera, and low sedges offer other options, depending on your region.
Repeat one main plant along the edge. A scattered mix of many low plants can look messy and become harder to maintain.
Check the mature spread before planting. Some ground covers quickly move across paths or into lawns. Trim them before they hide the edge. A living border takes more care than metal or stone, but its color and texture can make the extra work worthwhile.
12. Use Ornamental Grasses for Movement and Texture
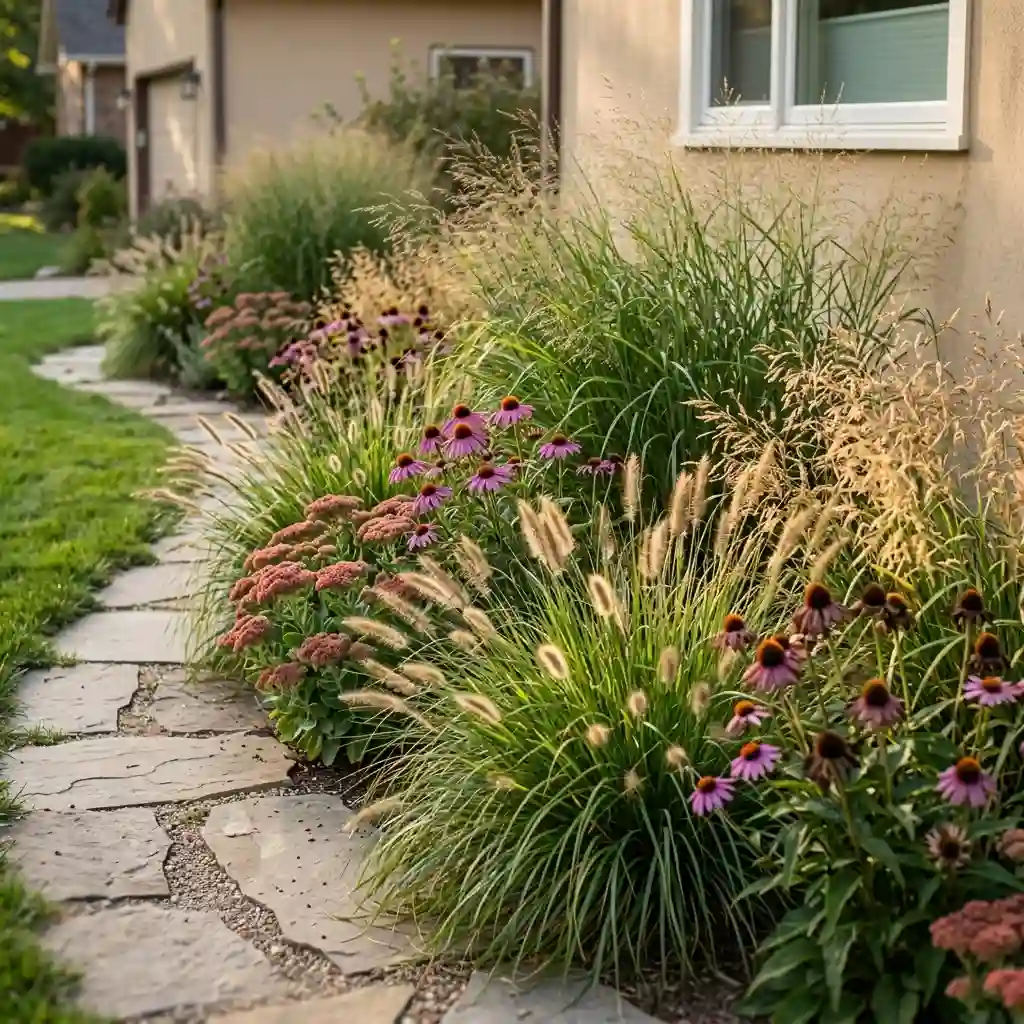
Best for: Modern, prairie-style, and natural-looking gardens
Ornamental grasses move in the wind and keep a border from feeling stiff. Their fine leaves also create a useful contrast with broad flowers and shrubs.
Choose clumping grasses instead of types that spread through underground stems. Spreading grasses can move beyond the bed and become difficult to remove.
Pair compact fountain grass or switchgrass with coneflowers, sedum, and other plants suited to your climate. Check the mature height because some grasses can block windows or cover nearby paths.
Grasses often look good after their main growing season. Their dry leaves and seed heads can add winter texture. Cut them back at the right time for the species and local climate. Your extension service can offer regional care advice.
13. Grow an Edible Border Near the Kitchen
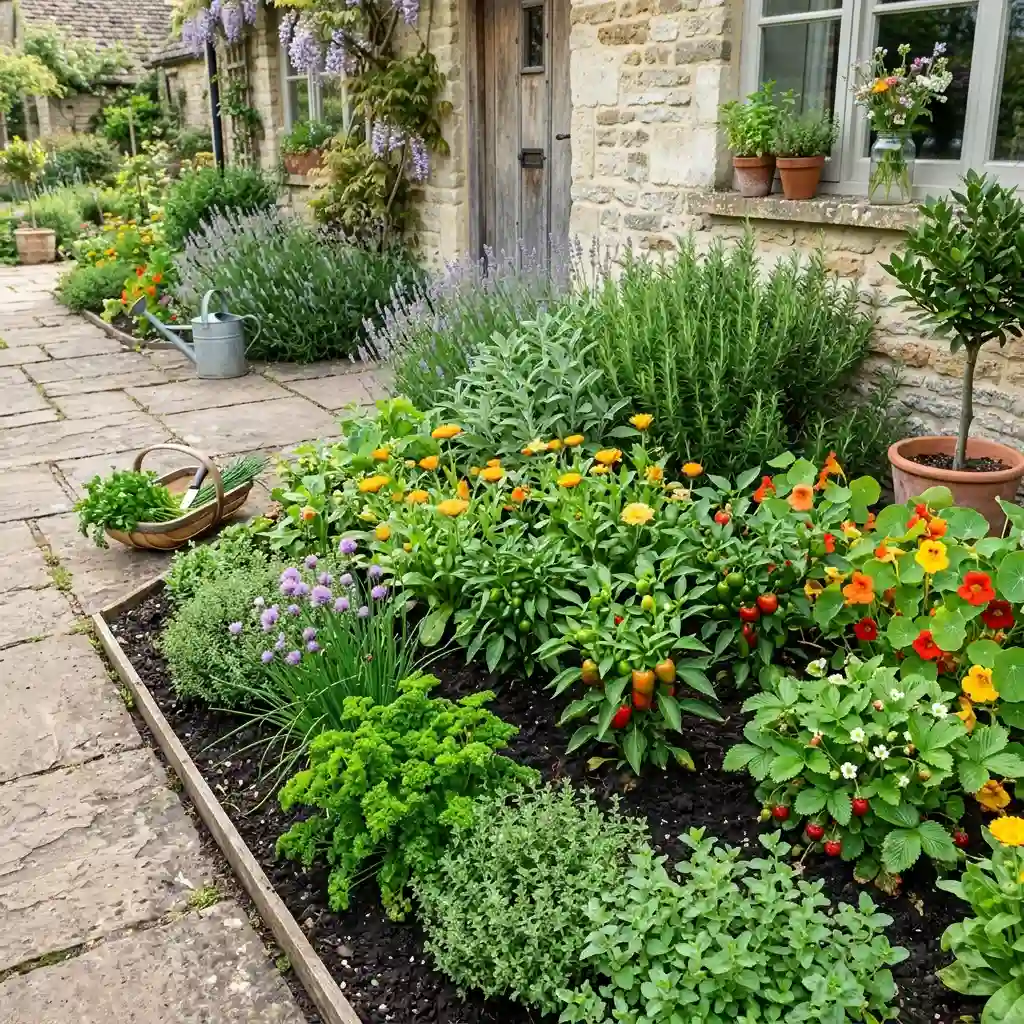
Best for: Small yards, patios, and gardeners who want useful plants
An edible border can give you flowers, foliage, and fresh ingredients in one bed. Place it near the kitchen or patio so harvesting stays easy.
Use chives, curly parsley, compact peppers, strawberries, and low-growing herbs along the front. Calendula and nasturtiums can add color, but confirm that any flower is edible before eating it.
Put plants you harvest often near the edge. Taller crops should sit farther back so they do not shade smaller herbs. Replace empty spaces when quick seasonal crops finish.
Edible borders need richer soil and more regular watering than many decorative beds. They may also look uneven after harvesting. Mix in a few steady plants, such as perennial herbs or compact shrubs, to hold the design together.
14. Help Bees and Butterflies with a Pollinator Border
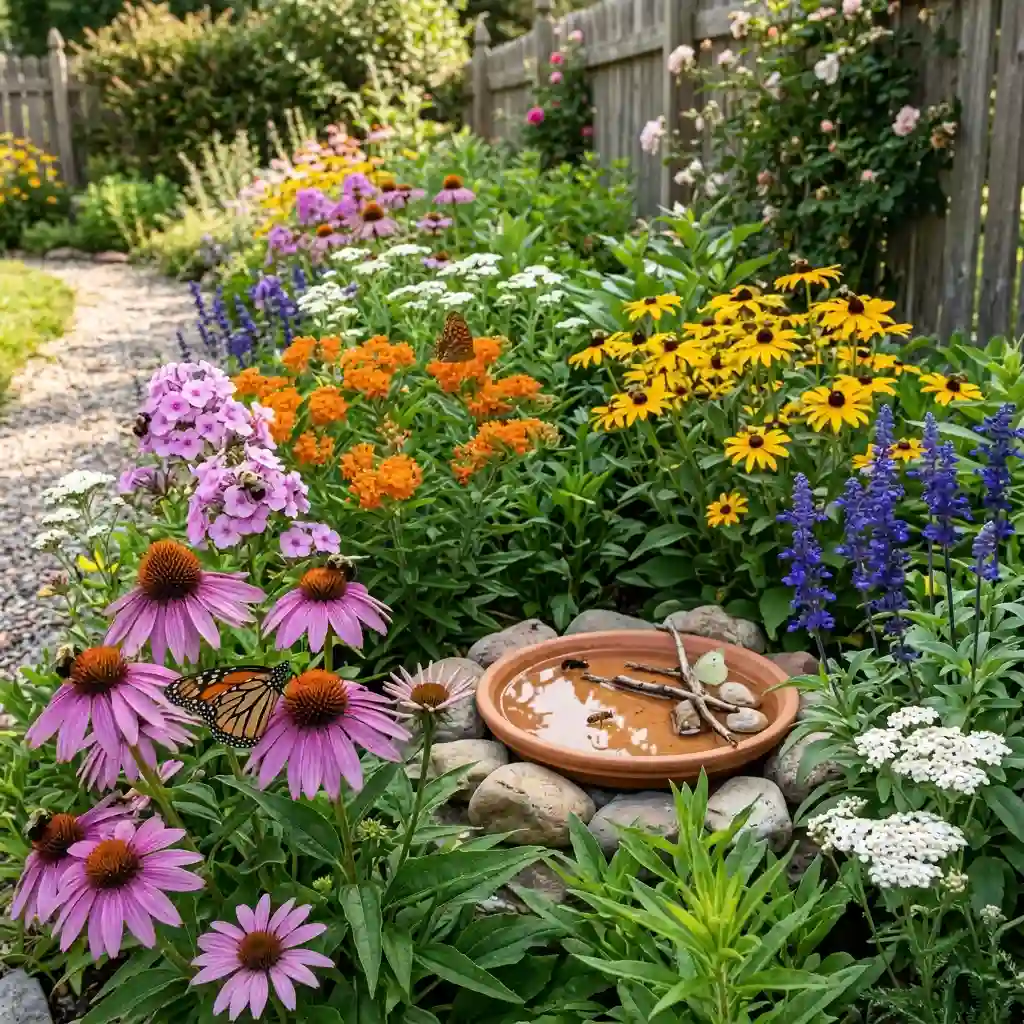
Best for: Wildlife-friendly yards and sunny property edges
A pollinator border can support bees, butterflies, and other helpful insects while adding months of color. Start with plants native to your region when possible. They are often better matched to local wildlife and growing conditions.
Include flowers across several seasons. Spring, summer, and fall blooms provide a more reliable food supply than one short burst of color. Plant several of the same species together so pollinators can find them easily.
Avoid routine pesticide use. A product meant to kill one unwanted insect may also harm helpful visitors.
Add a shallow water source and leave some sheltered spaces if the yard allows it. Plant choices vary by location, so check a local native-plant group, botanical garden, or university extension service before buying.
15. Brighten a Shady Border with Foliage
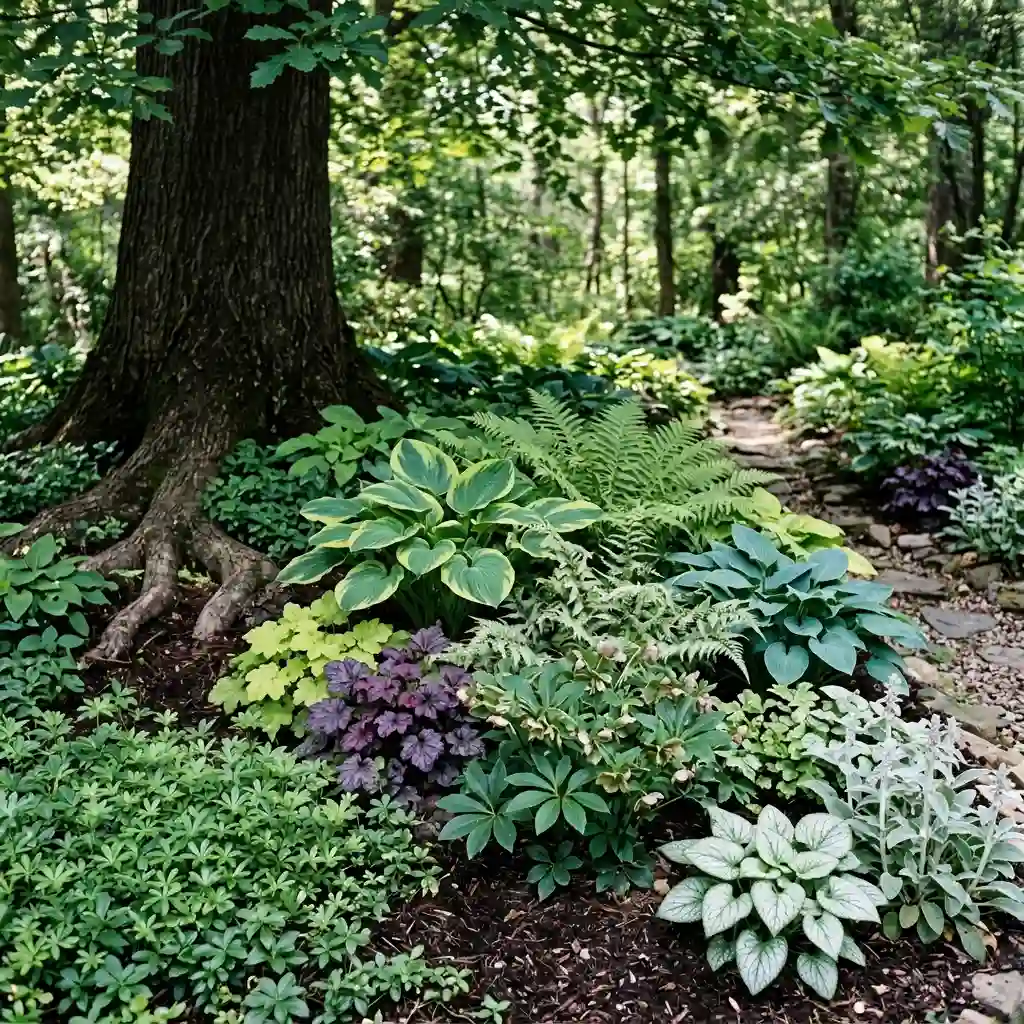
Best for: Areas under trees, beside walls, or along north-facing fences
Shade limits flower choices, but it does not have to create a dull border. Foliage can provide color, shape, and texture for a longer period than flowers.
First, check whether the area receives full or partial shade. Then test the soil moisture. Shade beneath a large tree can be very dry because the roots take much of the available water.
Combine bold hosta leaves with fine ferns and colorful heuchera. Pale flowers, silver leaves, or plants with white markings can make a dark corner feel brighter. Hellebores and suitable woodland ground covers can extend seasonal interest.
Choose plants that fit your climate and site. Do not raise the soil level around established tree trunks or damage major roots while planting.
16. Control a Gentle Slope with Raised Borders
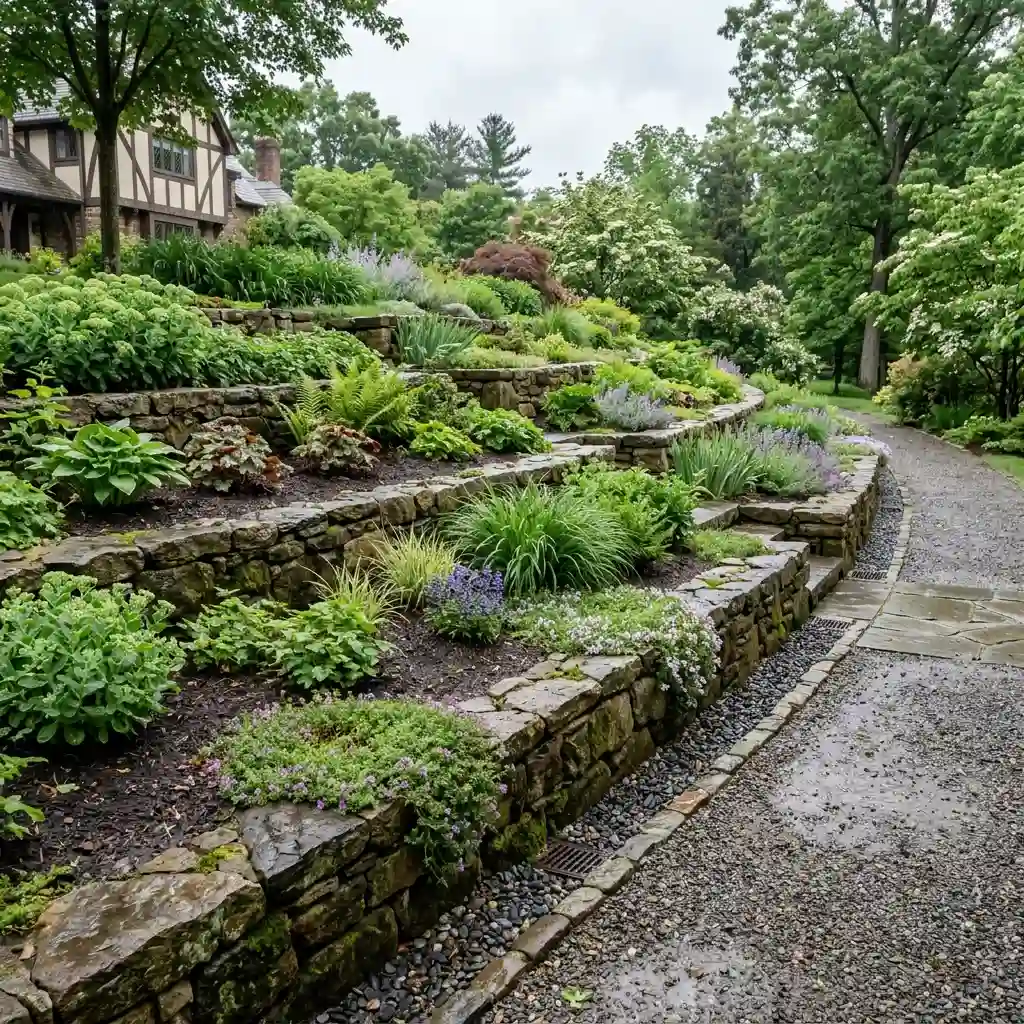
Best for: Sloped yards with minor runoff or soil movement
A raised border can break a gentle slope into smaller planting areas. This makes the space easier to use and may slow soil movement during rain.
Use timber, brick, block, or stone to hold the lower side of the bed. Direct water through or around the border so it does not collect behind the edge. Add deep-rooted plants and spreading ground covers suited to the conditions.
Low tiers often look better than one tall wall. Plants can soften each level and connect the separate sections.
Retaining structures carry pressure from wet soil. A larger wall may need drainage, permits, and professional design. Do not treat a serious slope problem as a simple edging project. Get local advice if the soil is moving or water is reaching the house.
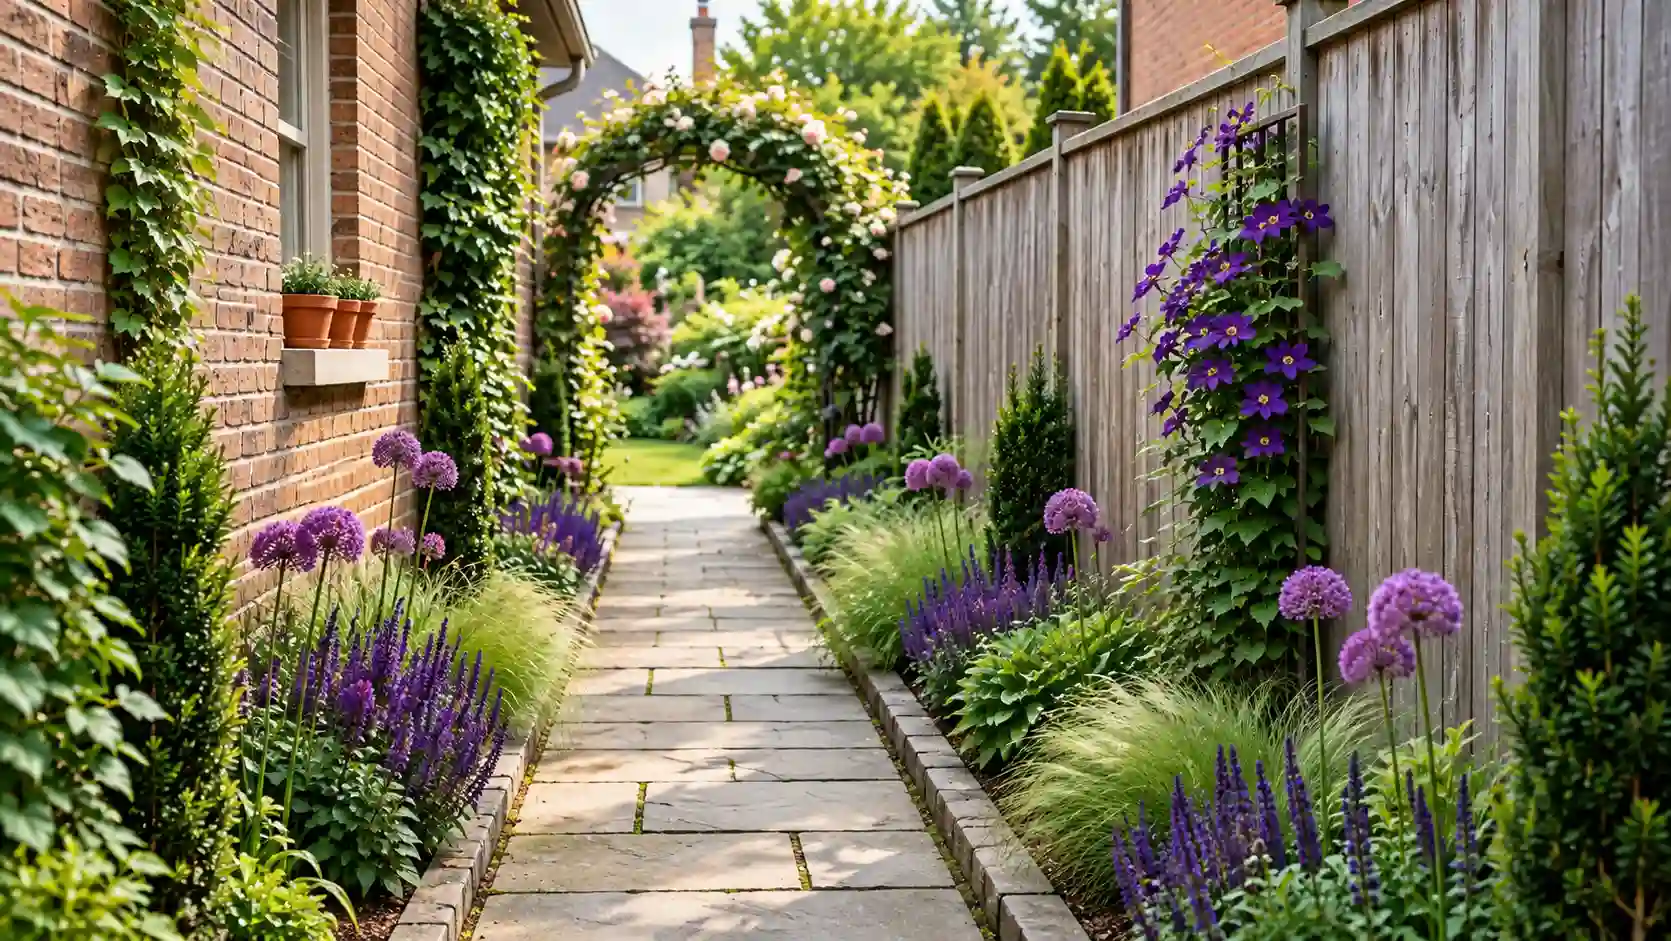
17. Fit a Narrow Border into a Small Yard
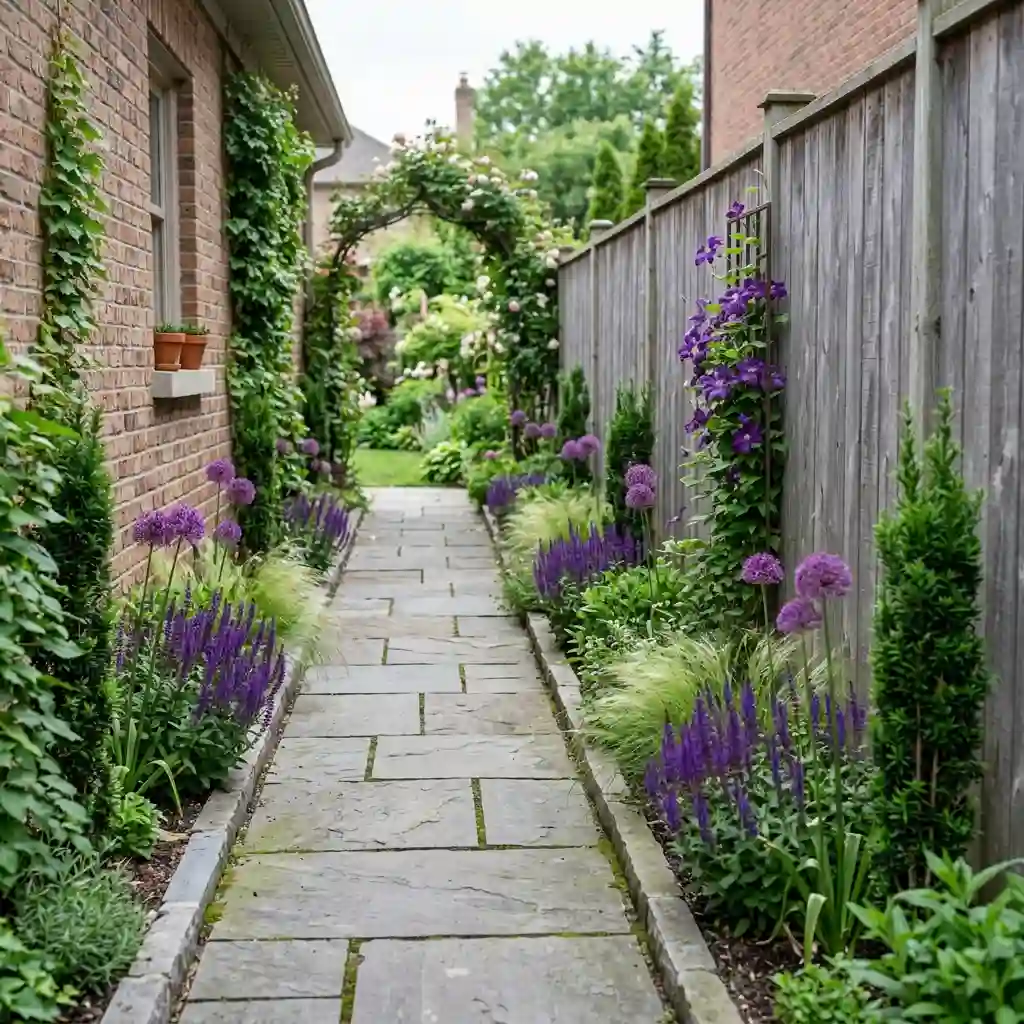
Best for: Side yards, small patios, and tight spaces beside fences
A border does not need to be deep to add color. In a narrow yard, the goal is to use height without letting plants take over the walkway.
Choose upright plants with a limited spread. Compact salvia, upright alliums, small grasses, and slim shrubs can fit into tight beds. Add a narrow trellis for climbing plants when you want height without using more ground space.
Repeat a small group of plants instead of adding a different type every few feet. Repetition makes the area feel longer and less crowded.
Check mature sizes carefully. Many plants sold in small pots become far too wide for narrow spaces. Keep thorny plants and stiff branches away from routes people use often.
18. Build a Dry Creek Border to Guide Water
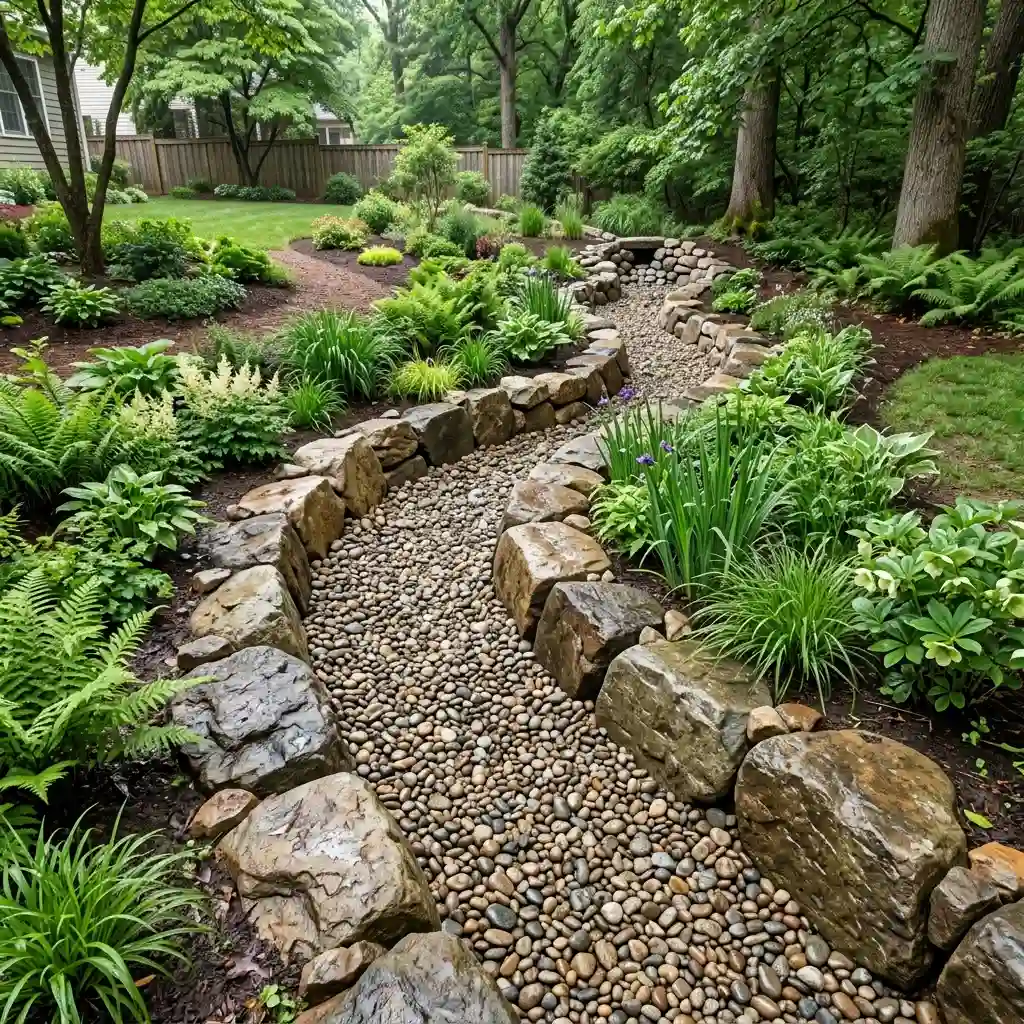
Best for: Low spots, gentle drainage routes, and rain garden edges
A dry creek can turn a runoff path into a garden feature. It uses gravel and stone to suggest the shape of a natural stream, even when the area is dry.
Follow the existing grade instead of forcing water in an unnatural direction. Place larger stones along the bends and edges. Use smaller gravel through the center. Varying the sizes creates a more natural look.
Add moisture-tolerant plants in areas that stay damp. Keep plants out of the main flow if they could block water or collect debris.
This design can help with light surface runoff, but it will not fix every drainage problem. Water near foundations, major erosion, or standing water may need professional assessment. Confirm where the water will end up before changing its path.
19. Mix Two Materials for a Custom Border
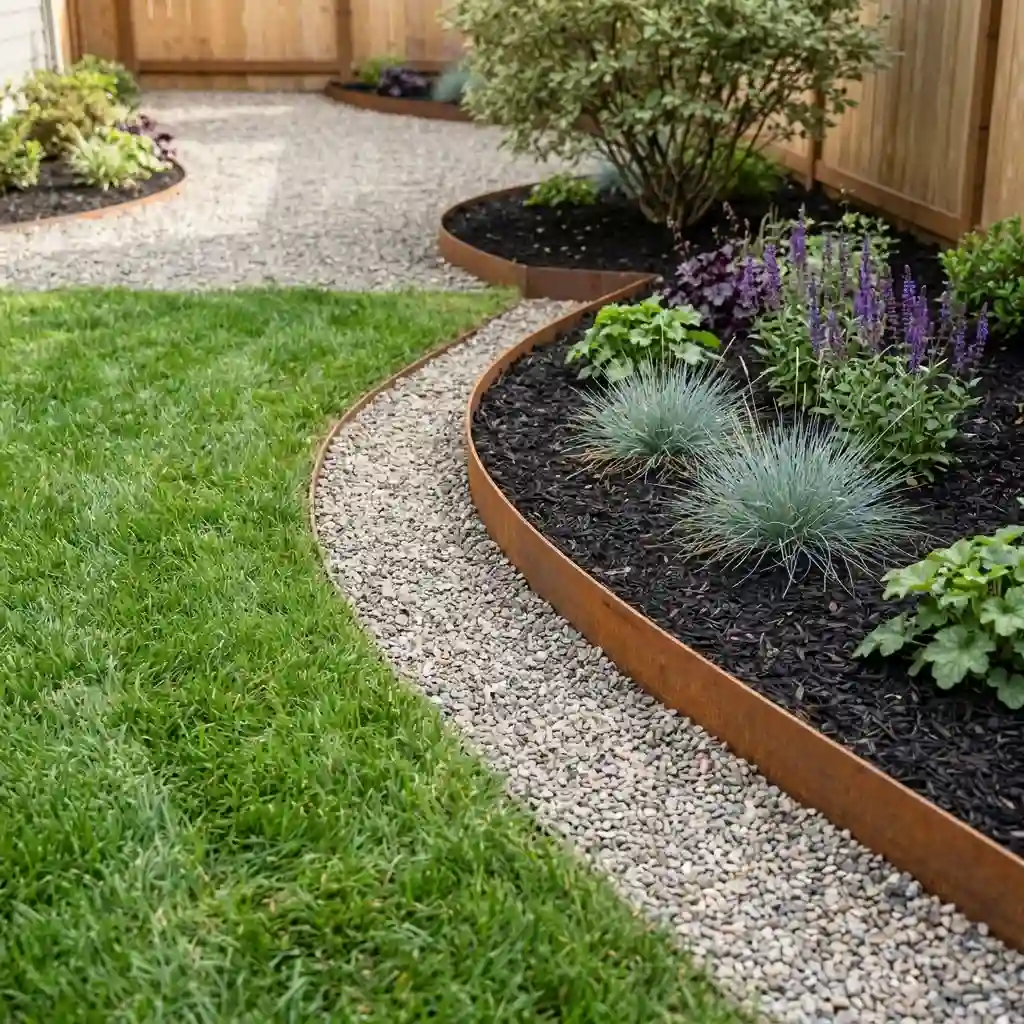
Best for: Yards that already contain several hardscape features
Mixing materials can help a new border connect with your patio, walkway, fence, or home. The trick is knowing when to stop.
Use two main materials, or three at most. Each one should have a clear job. For example, steel can hold the bed’s shape while gravel creates a mowing strip. Stone accents can mark corners or connect the border to a nearby path.
You could also pair flat brick edging with a low thyme border. The brick controls the soil while the plants soften its hard line.
Repeat colors and textures already present in the yard. Too many unrelated materials make a small space feel cluttered. These mixed-material garden border design ideas work best when one material leads and the others provide support.
8 Garden Border Mistakes That Create More Work
A good border should make your yard easier to care for. Avoid these common mistakes before you start digging:
- Making the bed too narrow: A thin bed leaves little room for layered plants and may look weak beside a large lawn.
- Ignoring mature plant size: Crowded plants compete for light and water. They also spill across paths.
- Using small, uneven curves: Weak curves look accidental and make mowing difficult. Use broad, clear shapes.
- Choosing aggressive plants: Some ground covers and grasses spread well beyond the border. Check their growth habits first.
- Mixing too many materials: Brick, wood, stone, metal, and gravel in one small area can feel cluttered.
- Skipping base preparation: Brick, stone, and timber may sink or shift when placed on loose soil.
- Forgetting water movement: Poor drainage can wash away soil or trap water near plant roots.
- Creating a difficult mowing edge: Raised or uneven borders may force you to use a string trimmer every week.
Mark the full border before installing it. Then walk around it, mow beside it, and view it from the house. A small change now can prevent years of extra work.
Give Your Garden a Clear, Useful Edge
A successful border balances shape, plant size, seasonal color, materials, and maintenance. It should connect with your home while solving a practical problem in the yard.
You do not need to rebuild every bed at once. Mark one area with a garden hose or rope. Look at it from several directions, then adjust the line before cutting the grass. Starting with a small section also lets you test the material and upkeep.
Use these garden border design ideas as a starting point. Then change the plants, materials, and dimensions to fit your yard, climate, and budget.